Lecture Notes: Using Markup Languages
Fonts, Spans, and Styles
A font is a collection of character symbols that determine how the text looks when it is displayed. To change the font of some block of text, you use the style="font-family:font-name" attribute in the tag block that encloses the text. This will work for <p>, <div>, and <span> blocks.
Here's a block of text in a paragraph (<p>) displayed in the browser's default (normal or standard) font:
Here's a block of text in a paragraph (<p>) displayed in the browser's default (normal or standard) font:
Lorem ipsum dolor sit amet, consectetur adipisicing elit, sed do eiusmod tempor incididunt ut labore et dolore magna aliqua. Ut enim ad minim veniam, quis nostrud exercitation ullamco laboris nisi ut aliquip ex ea commodo consequat. Duis aute irure dolor in reprehenderit in voluptate velit esse cillum dolore eu fugiat nulla pariatur. Excepteur sint occaecat cupidatat non proident, sunt in culpa qui officia deserunt mollit anim id est laborum.
Now, let's say that you want to change the color or font for this block of text. You can use the style attribute within the <p> tag to accomplish this. Here's the HTML code for this:
<p style="font-family:verdana;color:blue">
Lorem ipsum dolor sit amet, consectetur adipisicing elit, ...
</p>
And here's what it looks like:
Lorem ipsum dolor sit amet, consectetur adipisicing elit, ...
But what if you wanted different parts of the paragraph to be a different font and/or a different color. Using the above strategy makes all of the text within the <p> tags the same style. The solution is to use <span> tags. Here's what that looks like:
<p style="font-family:verdana;color:blue">
Lorem <span style="font-family:arial;color:green">ipsum dolor</span> sit amet,
<span style="font-family:courier;color:red">consectetur adipisicing</span> elit, ...
</p>
The HTML code uses <span> tags to change the style of parts of the paragraph. The <span> has no other purpose; it simply encloses text for the purpose of changing styles.
Lorem ipsum dolor sit amet, consectetur adipisicing elit, ...
Aligning Text within Tables
To create a menu style header, where one part is left aligned and the other right, place the text into a table. Note that by default a table uses less than the width of the page. Use the attribute width="100%" in your <table> tag.
Here's the code:
Here's the code:
<table  border="0" width="100%">
<tr>
<td><h2 style="color:red">Boats for Sale</h2></td>
<td><span style="color:tan;text-align:right">Home | Contact Us</span></td>
</tr>
</table>
Creating HTML Pages with Notepad
Building "pure" HTML pages requires the use of a text editor that does not add anything to the text file when it is saved. On Windows, the notepad program works well. On a Mac you need to find and install a text edit; the textedit program does not work unless you follow the instructions for editing plain text files (also sometimes called ASCII files) at http://support.apple.com/kb/TA20406.
The notepad program can be found under Programs/Accessories. Here's a quick video on where it is and how to create and save a file in notepad. The key is to load notepad, create the HTML file, and then save it. When saving, specify a .html extension. To view the file, just click on it from your file folder where you saved it. This will preview the file in your default browser. To edit the file again requires that you go to the file folder, click the right mouse button, and then choose "Open with", select your own program and pick notepad. Here's a tutorial on how to do that.
To "link" pages is simple: just build each of your pages and then place <a> tags into the page where you want to link to another page. The pages are independent; the linking is based on how to add links from one page to another.
Custom Style with External Style Sheets
External style sheets make it much easier to manage your style definitions across multiple html pages. Here's how you link from your HTML to the style sheet. Note that the style sheet is expected in the same folder (directory) as the html page.
<!DOCTYPE html PUBLIC "-//W3C//DTD XHTML 1.0 Transitional//EN" "http://www.w3.org/TR/xhtml1/DTD/xhtml1-transitional.dtd">
<html xmlns="http://www.w3.org/1999/xhtml">
<head>
<link href="style.css" rel="stylesheet" />
<title>Boatventures</title>
</head>
<body>
<h1>BoatVentures</h1>
<p>Simple paragraph text</p>
</body>
</html>
<html xmlns="http://www.w3.org/1999/xhtml">
<head>
<link href="style.css" rel="stylesheet" />
<title>Boatventures</title>
</head>
<body>
<h1>BoatVentures</h1>
<p>Simple paragraph text</p>
</body>
</html>
and this is the style sheet:
body {
background-color: #d0e4fe;
}
h1 {
color: orange;
text-align: center;
}
p {
font-family: "Times New Roman";
font-size: 20px;
}
background-color: #d0e4fe;
}
h1 {
color: orange;
text-align: center;
}
p {
font-family: "Times New Roman";
font-size: 20px;
}
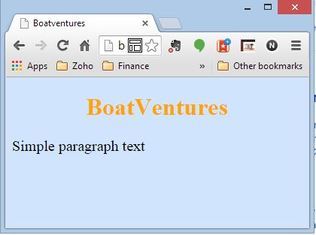
The resulting web page looks like this. Note that the background has changed and that headings and paragraphs have new styles.
